Picking up those brushes again.

Hi and welcome to the occasional mutterings of Dave Doc, a military modeller and some time gamer. Gaming and model making has given me a real education, History & Geography(obvious really), Artistry, Politics, Economics, Logistics, Project Management -you try building miniature armies without the last 3.

I will use the blog to record my creations & the odd occasion I actually do some gaming.

I have always been inspired by the aesthetic side of gaming. Playing on well constructed terrain using excellently painted units is always a joy.

Monday 30 May 2011

Brunswick black.

Black is an interesting challenge to shade and highlight. For the latest commission I used my own mixed dark grey charcoal colour. This was a mix of Humbrol 67 (Tank Grey) and Matt Black. This was used for the main undercoat. I then want to pick out specific areas of deeper black and this was done with the neat black for the shako , belts and packs. Once dry the whole figure was then give a light drybrush of light grey. Additional detail was painted in with thin strokes of grey. Faces as per normal. Facings in 3 shade triad of Vallejo Red and Green for the different units. Muskets and metallics added.  Some thinned Vallejo black was painted in on some deeper folds. These were then  matt varnished and once varnish had dried overnight I did a little  "refresh" of the metallics and a light flick across the "highlight" of the facings to add a bit more brightness.

The figures are old "Connoisseur" and are a simple uncomplicated paint job. I was short of standard bearers however so a couple of officers had to have additional work adding belts from green stuff to carry the standard. Flags are from GMB (Fixed using white PVA and then hardened with varnish - about 4 coats altogether applied once each is tacky dry). The flagpole was made from brass wire and the finials were formed by flattening the end with a hammer and then working in into spear point using a carborundum cutting disc on the mini drill, takes no more than 30 seconds per flagstaff and way cheaper then buying them.Horses are both "Elite miniatures" completed in the last batch of horses.


Wednesday 11 May 2011

Adieux de Napoléon à la Garde Impériale

These have been in the lead pile for so long I had no idea who made them (now reliably informed it is Redoubt Enterprises set apart from the Perry  Marshall one which I added to them). I have had a few days off work so have been doing these guys just as an interesting project. The sculpts of the figures have some individuality, with I am sure some of them having facial expressions of shock , and one of them even looks like he is crying. Great stuff


Next up Brunswickers - or how make to black look interesting!

Saturday 7 May 2011

Faces

One thing guaranteed to ruin a completed figure is a poor face. Faces for me bring things alive , so I always do them early in any figure paint.

But how to do it?  Some people can and do achieve wonderful face effects including eyes etc and I have nothing but admiration for the talent and time committed. My own method is a step down from that , but is simple to achieve a good effect time and again. It works on really crisp sculpts, and ones less so and for larger wargame armies I have created is a good trade off on time/reward. Remember that these are small areas you are talking about so try to paint for effect. They are also generally going to be viewed at a distance of several feet away.  (a 28mm figure  1-64th scale for a 6 foot person - you try looking a someone 64 feet away can you see the whites of their eyes? So viewing even further away reduces the minute detail required)

Some basic principles , work from dark to light , inside to out. Areas that are import are Nose, Forehead, Cheeks, Chin, Lips, Ears, Facial hair.

OK time for some pictures . These guys are part of a 28mm vignette piece. they are prepared so far with dark grey undercoat all over ( black is too unforgiving IMHO and makes lighter colours hard work). they also have their headdress main colour completed - in this case black, and dry brushed for later once the face is done - I don't want to go near the face with a larger dry brush once completed in case of causing damage needing re-work. Another part of my philosophy, do it once, do it right re-work is wasted time!

START


STAGE1 - Dark Brown to (This Vallejo FLAT BROWN) all the flesh area, however if you want black, grey facial hair later then leave this uncovered


STAGE2 - Lighter Brown , starting with the nose, across the forehead , cheeks, ears, chin, and lips. Leave a little of the dark brown showing in the deep recess. If the figure has something cast deep in the eye , just flick across that with the light brown ( This is Humbrol 110 - Natural wood - I do also use Vallejo Khaki Grey too , both work well)


STAGE3 - Dark Flesh tone . Vallejo Dark Flesh - thinned slightly with water.. Again work the same area , but covering slightly less area , leave some of the light brown showing. Add some neat un-thnined dark flesh to the main cheek areas, chin, outer ear, if it needs lightening further.


STAGE4 - Light flesh tone . Vallejo Light Flesh - thinned slightly with water. just highlight the key areas, nose  top, nostril sides if cast well enough, cheekbones, chin , lip,, centre of forehead.


If no facial hair , your done!

STAGE5 - Facial hair base. Depending on the colour you want , then  use dark , then light combination. These are "grumblers" so I went for a Vallejo Light grey and used small strokes to highlight across the moustache, beard and sideburns.


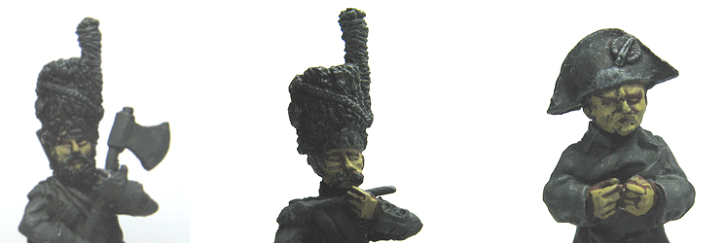
STAGE6 Facial Hair - light. Using the lighter colour, use dabs, dots, or single stroked to highlight the beard, moustache and sideburns as required. - up close it can look a little odd, but move it further way it works.

Now you little people have some soul...time to get the uniform done!

And a distance view - this is taken from about 6 inches away

Colours used:-
Dark Brown - Vallejo Flat Brown 70984 - or Humbrol 170
Light Brown - Vallejo Khaki Grey 70880 - or Humbrol 110 or 83
Dark Flesh - Vallejo 70927
Light Flesh - Vallejo 70928
Facial Hair combo- in case Vallejo - Light Grey 70990 , and Off White 70820

I have used this basic face technique for 6mm, 15,mm, 20mm, 28mm across the years , the basic principle stands up well , you just need fewer colours the smaller the scale. It also works particularly well under a gloss varnish which picks out the light flesh highlight well.

Hope it is of use!

And with uniform

Monday 2 May 2011

Horses

I have a few projects coming up , so I have decided to to complete a job lot of 28mm horses to hold ready to use when required. I have a stock from various manufactures (These are Conoissuer, Elite, Bicorne , Front Rank, and a few of unknown provenance) which I have accumulated over the years so it gives a reasonable amount of variety.

These horses are to be completed in oils. I use two brown colours , Burnt Umber (a dark brown - gives a dark chestnut finish) - and Burnt Siennia (a lighter redder brown- gives a red chesnut /bay finish).Oil is a very forgiving medium which takes a long time to dry fully so can be worked easily to achieve results.A well sculpted horse will really reward this method of painting.

Check out "Horse Color" website for more detail of horse colourings and markings in real pictures..

It is not worth doing just a few horses so altogether I have done 64. So here is a walk through how it's done.

Preparation -
1-  Clean up castings and attach to something to hold them while painting.
2-  Undercoat in Yellow (rather than white as gives a subtle tone to the end result)- this is Humbrol 74 and allow a full 24 hours to dry.Also use 83 Ochre
3-  Paint in horse furniture, this was with Vallejo black. Sometimes I do miss this step if not sure what colour I will be using as it can be completed once the oil has dried too.


4 -Apply neat oil with a large stiff brush - do this to all the batch. This is messy so don't do it on the dining table! I usually also use some protective gloves as well. I don't thin the oil with a spirit or medium, just use it neat and work in it all over.


5- Wipe of excess oil , this can be completed with sponge, large soft brush (wipe off any excess that accumlates on the brush as required), absorbent paper towel. Each of these gives a slightly different effect. Work from the horses head down and backwards. Leave a thin covering of paint on the muscle tops , flanks etc. Let the oil do the shading work in the creases , the mane, tail and underbelliy etc. If you don't like how one comes up, just apply oil again.


6- Leave to dry! I find these usually take a few days to dry somewhere warm and ventilated, it may take longer somewhere colder.

There are ways of speeding the drying time if you need to such as using quicker drying oil paint, or mixing with a medium such as Liquin. 


7- Add any horse furniture metals , colour hoofs, mane and tail , socks or blazes -(white or black usually).


8) Once finished they can be varnished matt, satin, or gloss, either an acrylic or enamel works fine. I would  test a small area if you have been impatient - as it can run in area where the oil had been left thicker.

This method can also be used for horses with cast saddles or one piece horse/rider casting etc, just clean off excess oil after wiping, and obviously do this before painting the rider!

It has taken 3 hours- an hour a day over 3 days to get these 64 to stage 6. Once dried I can just complete the last stages in a few minutes as I need each horse.

Apologies as a couple of shots here are not in sharp focus - a new camera is on the "wants" list.